An API key is a unique key, which allows you to link your exchange account with Smartrader in order to interact with the information that our App requires to execute your orders. It gives you the assurance that we will never have access to your funds by restricting us to access just to what is necessary for your automated investments.
Next, we will guide you through the process to create an API key in the Binance exchange, so that you can do it step by step in an easy and fast way.
1. Access the API menu
- Log into your Binance account from your cell phone and go to the “Home”🏠 section (located at the bottom left of the screen).
- Select ”More” to see more options.
- Swipe the screen until you find the ”Others” section.
- Select ”API Management“.

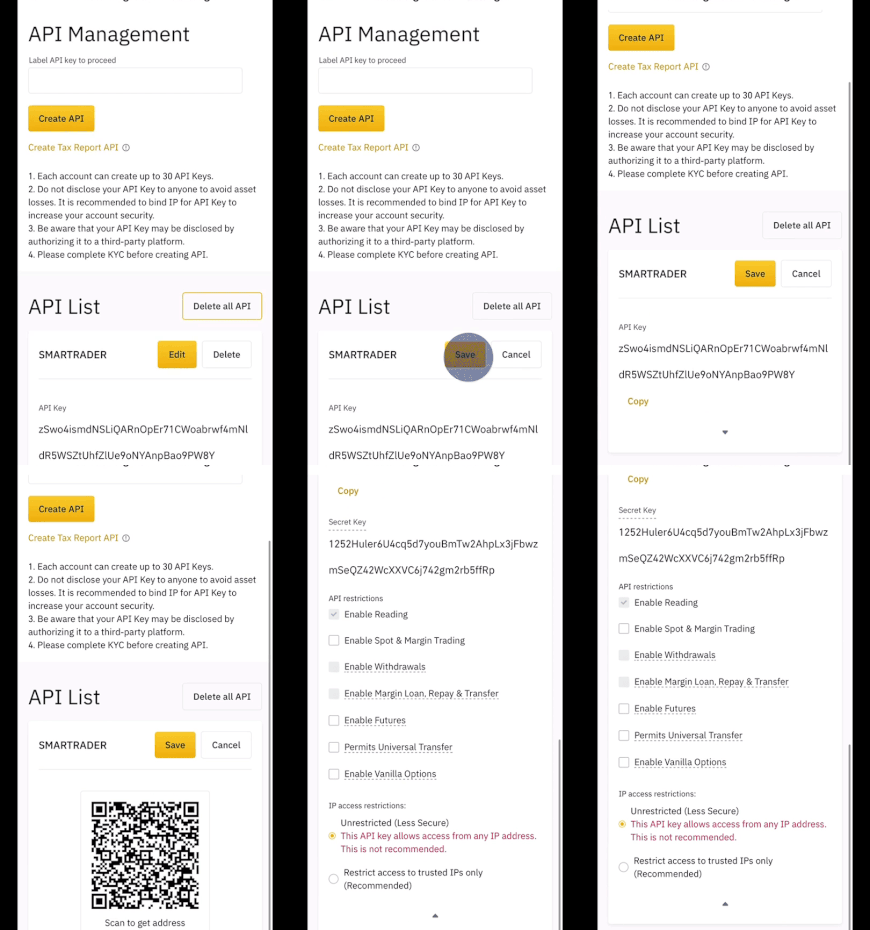
2. Create a new API key
- In the ”Label API key to proceed” box, add a tag or title that allows you to identify each key (example: Smartrader).
- Once you have added a title or tag, select ”Create API“.
Note: Binance allows you to generate up to 30 different API keys, so we suggest you keep track of those that you are generating, adding titles or tags that make it easier for you to identify them.
3. Identity verification
Complete the identity verification to continue with the API key creation (you must have two-factor authentication).
- Press on ”Get code”. You will immediately receive an email with a 6-digit code that you must fill in the first box. (Email verification code)
Then, enter the code generated in the authenticator that you use (you can use the Google Authenticator app).
- Press the ”Submit” button.
Note: Two-factor authentication (2FA) is a protective measure that provides a higher security level to users’ accounts, asking for more than one proof of identity. Apps like Google Authenticator provide random login keys, which are constantly changing (example: every 30 seconds).
4. Save your API key!
Your API key has been successfully created! It is very important that you consider the following recommendations:
- Keep your password safe and do not share it with ANYONE.
- Store your secret key in a safe place, since it will not be shown again and if you lose it you will have to delete your API and create a new one.
- It is recommended to restrict API access to trusted IP addresses only.
5. Enable Permissions
Configure the API key so that it works properly with Smartrader.
- Once your API key is created, the ”API Management” menu will be displayed.
- Select the API to which you want to enable permissions (in this case the one you have created to connect with Smartrader).
- Click on ”Edit” and then another click on the small arrow located under the API key.

-
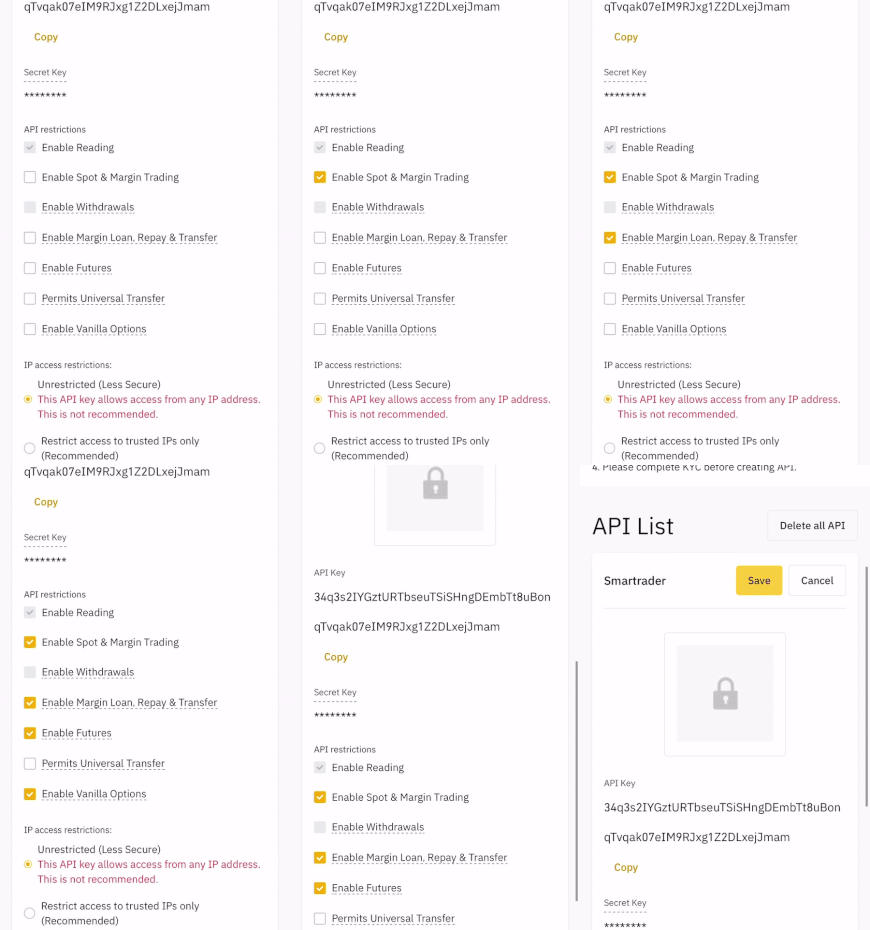
In the section ” API Restrictions”, you must enable ONLY the following permissions for the API key:
-
Enable Spot & Margin Trading
-
Enable Futures (this is just if you are willing to trade futures,and requires a Binance Futures account.)
-
Go back to the top of the API settings and click on ”Save“.

Note: In order to enable an API key for margin futures trading, you must have a Binance Futures account. If you don’t have one yet, you can create it directly in the Binance app, in the “Futures” section. It is worth mentioning that this is a totally free account and is linked to your same Binance account, therefore it will not ask you for additional personal information or any other verification requirement.
Once you successfully created your API key and enabled the required permissions, you can go to the Smartrader App, access Profile>Exchanges>Link new exchange. Then, select an exchange and introduce the API key that you created. Your Smartrader account will now be ready to operate!


